Wednesday, April 22, 2015

Body Paint! (or, So You Want To Go Green)

   I've had a lot of questions about having green skin, so a little more on that here. To go green, I use an alcohol based dye and an airbrush.  I've been using Skin Illustrator liquid, but there are a few brands out there. For Gamora, I used about 60% green and 40% Jester Yellow.
There's no friends like con friends!

  Water based vs alcohol based: There are a lot of good water based paints out there, and they're a good place to start. They're cost effective and easy to obtain, and with a good sealer are not a bad choice for learning. The down side is that no matter how well you seal, it will rub off on your costume, your props, other people, etc. If you're only painting for a photo shoot or are painting your skin in such a way that the color won't have much contact with your costume or anything else (say, a tattoo or maybe you just need to paint your face, something like that) it's probably not a bad way to go. Just don't expect it to last all day.
  Alcohol dyes don't.come.off. For real. You can put the stuff on in the morning and it'll still be there that night. I've had very minor rub off on my collar and at the joints of my fingers, but other than that, it's there to stay. Exhibit A:
This was taken a few hours after a con, after changing out of my costume, eating, and working in the yard some. Still quite green.

 The biggest drawback, of course, is the cost.  Skin Illustrator runs around $11 per ounce and it takes 6-7 ounces to do my face, torso, arms and back. We didn't paint the middle of my back to save some money, but because of the cutouts on the vest we had to do the sides of my back. Mark out only the parts of your skin that will show to avoid unnecessarily wasting dye!
  Liquid alcohol dyes can be sponged or brushed on, but I prefer an airbrush because it gives a much smoother application. Of course, it helps to have a partner to do this, and one you don't mind being highly personal with you depending on what you have to paint! Most alcohol dyes can be sealed either under the dye or over it depending on the brand, but personally I don't use a sealer. It makes me feel sticky and it doesn't really seem necessary with the staying power it already has.
 There are removers on the market for alcohol dyes but I've never tried them. I find that scrubbing with baby oil (and if necessary, rubbing alcohol for any stubborn spots) does the job just fine.  Not gonna lie, it takes a while and a LOT of scrubbing, but it works. A shower will not. Exhibit B:
I can remove the dye from my arms and face and such myself, but obviously I can't reach my back. This is after removing all the dye I could reach and after taking a long shower.  For real....this stuff stays on.

  I find that there is a slight sheen with the dye and it's most noticeable on my face. To combat this, I made some green powder by adding some powdered food color to baby powder and brushing it all over my face.
 
Other info-

  Remove your body hair. All of it. Don't think there's enough hair to worry about?  That's cool. I didn't either, the first time.  Go ahead and paint yourself.
  Yeah. That paint sticks to every tiny hair and makes you look like a muppet or a cactus or something.  So, razor, wax, Nair, whatever floats your boat.  But make sure you get it all!
     Side note: If you have a cut/scrape/abrasion and get Nair in it and leave it for ten minutes, it'll make it worse.  A lot worse.
      Side side note: If you spray alcohol dye into resulting open wound it will sting like bejeesus. Just saying.

  Painting your entire face will alter your perception of color slightly. I can only assume this is due to different colors of light being absorbed/reflected by your skin, but it's a little disorienting if you're not prepared for it. (My boyfriend claims I'm hyper-sensitive to things like this, so it may not happen to everyone.  But it's weird.)

  Painting your face all one color will also make it look really flat in pictures. If you haven't learned about facial contouring yet, now would be a good time!

  Most grown-ups at cons are wary of touching body paint. Most kids are not. This has never been a problem with alcohol dye but something to be aware of with water based paint.

  I carry disposable gloves for potty time, and a straw for drinking time.

  It takes around an hour to paint my upper body one solid color. Make sure you're dry before moving (fortunately alcohol dye dries pretty fast) and having a fan around helps with the fumes.  Unfortunately, the alcohol dye is REALLY COLD and the fan makes it worse, so it's kind of a toss up between being able to breathe and being not freezing.

  If you're airbrushing, use a smaller tip for the face than the body.  It takes longer, but there's so much overspray with the larger tips that it makes it really, really hard to breathe.

  Clean up your mess with some rubbing alcohol.  Hotel maids don't love colored residue everywhere.

And I think that's about it! And if not, just ask! :)


Monday, April 6, 2015

Wig tips and tricks!

When I first got into costuming, I only ever did blonde characters because I wasn't sure how I'd feel about wearing a wig. I have a lot of sensory issues and didn't think I'd be able to handle all my hair being under a wig cap and then a wig on top of it. But, as there were lots of people I wanted to portray that weren't blond, I decided to give it a shot.

  I bought my first wig about a year ago, and while it's no picnic, it wasn't as bad as I thought.  I've learned a lot about wigs over the past year, so I thought I'd share some of that here.

First things first, wig caps!  I've used different kinds and the only kind I like are the mesh type as opposed to the sheer, pantyhose type. I have a lot of hair and so I need a lot of bobby pins to pin it all up. With the mesh caps, I can pull out all of the bobby pins before putting the wig on, so they're not digging into my scalp.  Huge plus.

All my wigs come from Epic Cosplay. I love their wigs, the price is great and the quality is fantastic.  Also, shipping is extremely fast and FREE! These wigs can be put through a lot and still retain a great appearance.

Styling a wig can be scary if you've never done it, but as long as your wig is made of good, heat-resistant fibers, it can be easier than styling real hair. I do recommend some sort of wig stand though; it's pretty difficult to style it otherwise. I use a wig head attached to my body double, but in the past I've used a "volunteer" in the form of my daughter as well. Pretty much any styling product that's okay for real hair is okay for a wig as well. I have found that foam rollers work better than my curling iron for curls, but a flat iron works great for straightening or making loose waves.

All that product can make your wig messy and frizzy though! I've found the best way to tame a wig is to wash it (they make wig shampoo but I always just use regular shampoo and a tiny bit of conditioner to help with detangling) and then combing the tangles out. Then, while it's still damp, I flat iron the whole thing. The dampness creates steam that really helps to lay the hairs flat. I don't know if that's bad for a flat iron; I know you're not really supposed to use them on wet hair unless they're designed for it.  I use a cheap one just to be safe. I mean really cheap. Like $20.


 I didn't take a before pic, but here she is after washing and halfway through straightening, and when it's all done.  You can see the difference between the frizzy puffiness and the sleek look after. I also tried to take a "during" pic because it looks really terrifying and you'll probably be worried you ruined the wig. When the hair is wet, it really looks like it's fusing together into one useless plastic sheet!

The most commonly accepted way to curl a wig it either to put sponge rollers into the wet hair and then blow dry each roller (for like, EVER) to heat them, or to put in rollers and then dip the whole thing into really hot water and then wait for them to dry. They both work, but they're tedious and boring and I'm impatient. So one time when I was using the steam method with the flat iron to straighten a wig and my boyfriend at the same time was steaming a shirt, I had the idea to use the garment steamer to style the wig. I thought, wow, I'm a genius! A quick search of Google told me I wasn't the first to have this idea (disappointing) but man is it ever easier and faster than the other ways.


 Just roll her up and use a garment steamer to blast all over her head. The longer you steam, the tighter the curls will be...the first time I tried it I steamed way too long and ended up with freaky tight curls all over. The second time I overcompensated and ended up with barely even waves. The third time I got it right though! The wig was a little too tightly curled around the face, so I used the steamer and a comb to relax the hair in that area. It's been several days and the curls haven't come loose at all and I didn't have to put any product in it.

Wigs should be stored with care. Most of the time it's fine to store them in the plastic zippie bag they came in, but I prefer to store them on a wig head with a clear produce bad over them to protect them from dust. Plus it's just amusing to have a row of creepy-looking heads on the top shelf.

Friday, March 20, 2015

Internet famous! (Or, Shortest Post Ever)

Okay, maybe not *actually* internet famous. But I'm excited because today I'm featured on Daily Cosplay with my Gamora costume! I've also been told that they will be featuring my Kitana next month. How cool is that?!

Love you all!

 ~Athena

Tuesday, March 17, 2015

Gamora Costume tutorial

 Now that All-Con is over, I finally have time to write this post! I was seriously still working on this costume the night before we left. I ran into one snag after another in making this but finally managed it after much guessing and failing and correcting. And spending.  LOTS of spending. Way more than I'd expected.  Cost of materials on my body here is maybe in the $150 range, but actual cost of making this was closer to $420ish. So there's that.

 All that aside, I had fun wearing this! So, here's the how. 
Gamora's costume consists of a one-piece open sided jumpsuit, a mesh tank top, boots, knee guard pad cover things, a collar, belt and holster (or, at least, holster-type thing) and guard/gauntlet type arm bands. Those were tricky. More on that later.

The jumpsuit itself was the easiest part. I wasn't really sure how to make the pattern initially, so I just put on a tight fitting tee and drew the pattern on one side and then cut it out.
I drew out the whole top part, but I only defined and cut out one half.

Here it is flat, with the back on the left and the front on the right. I put the back part on the fold of the blue fabric and then cut one big piece and sewed it at the shoulders and front. 
Then I cut black vinyl pleather material and covered the back and under the arms, and then used a black athletic mesh fabric on each side of the front of the vest from the bottom all the way up to the collar. After that, I made a simple pair of leggings and sewed the top to the bottom to make a jumpsuit, and painted on the blue squiggly designs. In the movie, the area around the knee appears to be an attached knee guard like in motorcycle pants. I couldn't find any material that would work for that, so I ended up cutting up some ribbed leggings and just pulling them on over the pants.  Not ideal and I intend to keep looking, but it'll work for now!

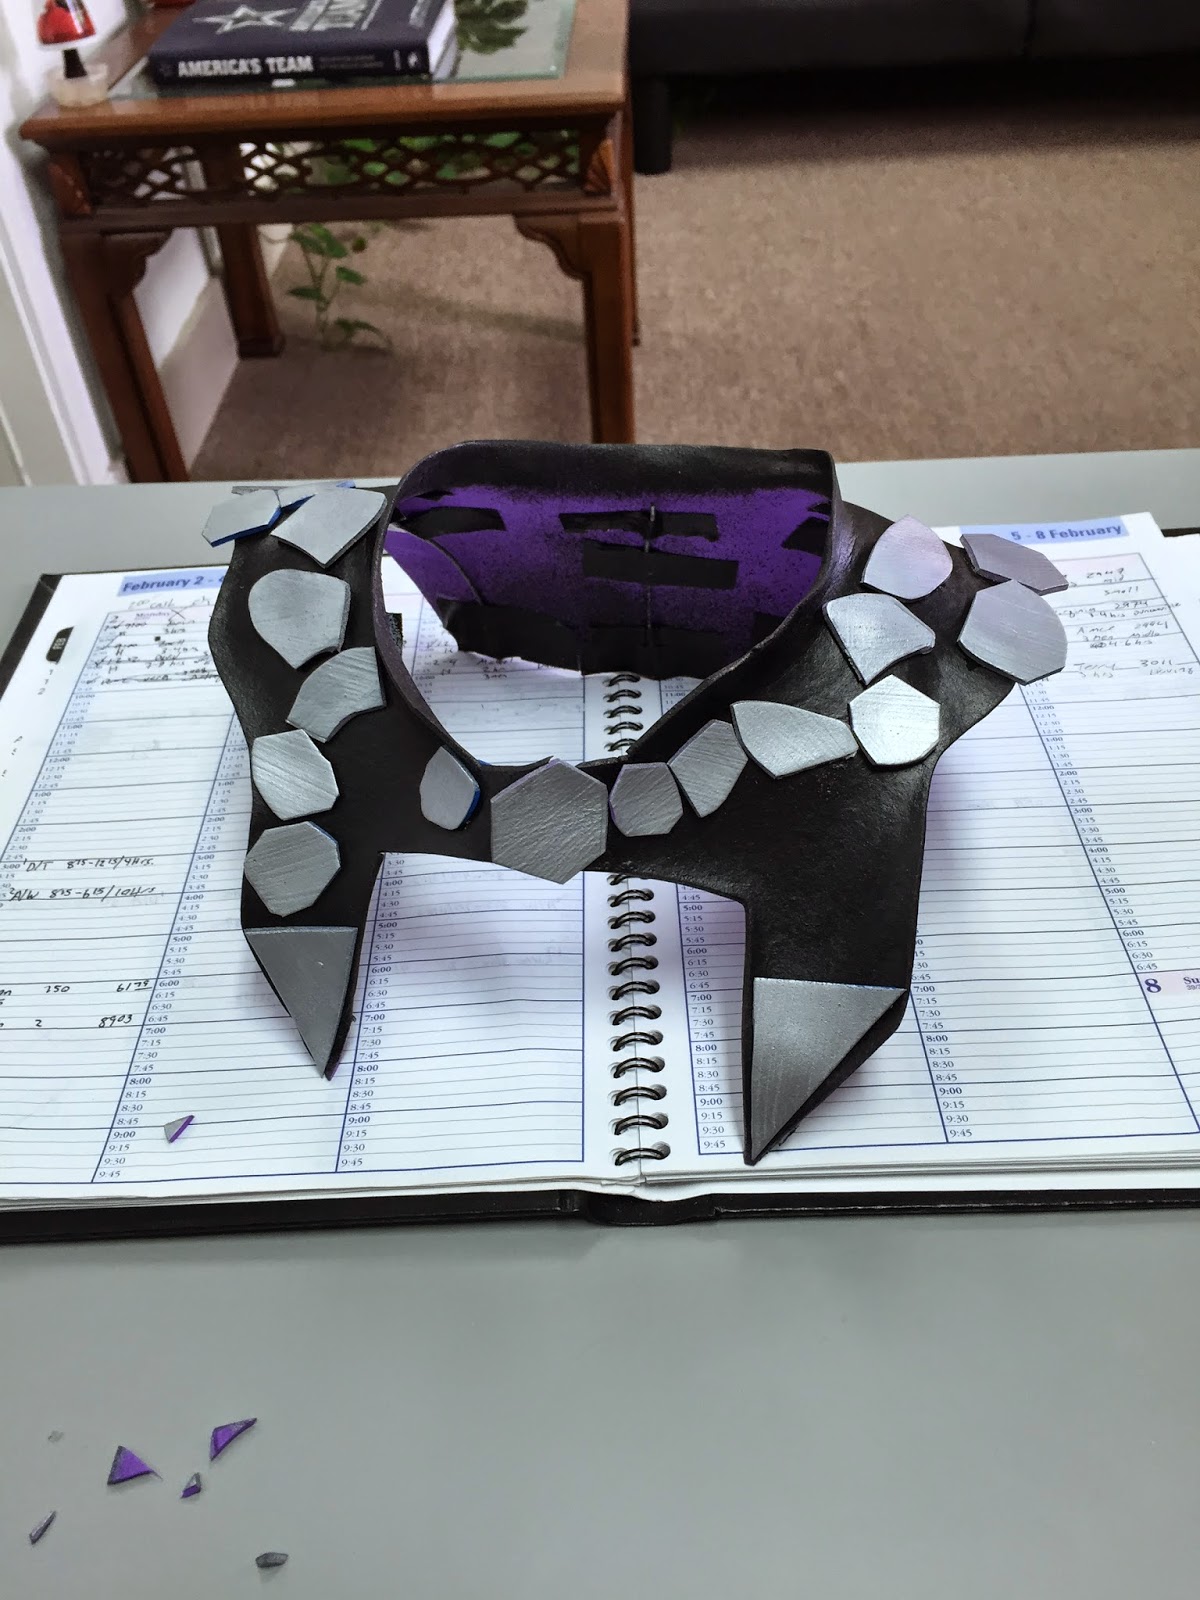
 I made Gamora's collar and holster both from fun foam (I think fun foam may be a defunct brand name because no one ever knows what I mean by that.  I'm talking about that thin craft foam.)
This is the rough outline of the collar


I cut it out and heated it with a heat gun and molded it over my body double. It's not as complicated as it seems, I promise!


Here it is finished and painted with Plasti-Dip. I had to add wires on the inside because since it's not attached to anything, it had a tendency to want to go flat again. The wire helped it to hold its shape. 

 Okay, the gauntlets were tricky. I just wasn't sure how they were made! I looked at other tutorials and I didn't like the ways I had seen them done. Then I looked at scenes from the movie till I was cross-eyed but I finally came up with A Plan.


Okay, I'm going to do my best to describe this. I didn't have any sort of pattern, I had to completely wing it when it came to these. Basically, I wrapped canvas around my arm and marked a thumb hole. Then, I marked long, tapered strips, long enough to wrap around my arm two or three times. They pass through slits at the base of the brace. I have a vague recollection of long ago seeing something like a medical brace with a similar construction? I don't remember exactly what but if you know what I'm talking about it will help you visualize this. Then I added the blue contrasting fabric and buckles to hold the tapered ends in place, and a snap on the inside to hold the thumb flap down.

The cords around her leg kept slipping. I solved this by making two narrow bands of shelf liner to put under the cords. They didn't move all day!
The makeup was Skin Illustrator FX alcohol ink airbrushed on by my patient boyfriend.  I did her facial scars with Mehron Rigid Collodion under the ink, then added a bit of color to them with eyeliner and eyeshadow after the ink was dry.  I felt that the green ink by itself was too dark, and I plan on adding some yellow next time I do this. I also thinned the ink with alcohol for a more translucent look. I want to go on the record as saying I could not find anywhere that said it was okay to do this in any way! I didn't have any problems at all, I'm just sayin'.


For her wig, I harvested wefts from a pink wig that I had and just sewed them along the hairline. Since the pink wefts are about the same length as the brown, I think I'll need to trim the brown a little.  Theres a few pics where you can't see the pink at all!

So that's that.  I'm sure I'm missing a few things but I covered the important bits!