Tuesday, March 17, 2015

Gamora Costume tutorial

 Now that All-Con is over, I finally have time to write this post! I was seriously still working on this costume the night before we left. I ran into one snag after another in making this but finally managed it after much guessing and failing and correcting. And spending.  LOTS of spending. Way more than I'd expected.  Cost of materials on my body here is maybe in the $150 range, but actual cost of making this was closer to $420ish. So there's that.

 All that aside, I had fun wearing this! So, here's the how. 
Gamora's costume consists of a one-piece open sided jumpsuit, a mesh tank top, boots, knee guard pad cover things, a collar, belt and holster (or, at least, holster-type thing) and guard/gauntlet type arm bands. Those were tricky. More on that later.

The jumpsuit itself was the easiest part. I wasn't really sure how to make the pattern initially, so I just put on a tight fitting tee and drew the pattern on one side and then cut it out.
I drew out the whole top part, but I only defined and cut out one half.

Here it is flat, with the back on the left and the front on the right. I put the back part on the fold of the blue fabric and then cut one big piece and sewed it at the shoulders and front. 
Then I cut black vinyl pleather material and covered the back and under the arms, and then used a black athletic mesh fabric on each side of the front of the vest from the bottom all the way up to the collar. After that, I made a simple pair of leggings and sewed the top to the bottom to make a jumpsuit, and painted on the blue squiggly designs. In the movie, the area around the knee appears to be an attached knee guard like in motorcycle pants. I couldn't find any material that would work for that, so I ended up cutting up some ribbed leggings and just pulling them on over the pants.  Not ideal and I intend to keep looking, but it'll work for now!

 I made Gamora's collar and holster both from fun foam (I think fun foam may be a defunct brand name because no one ever knows what I mean by that.  I'm talking about that thin craft foam.)
This is the rough outline of the collar


I cut it out and heated it with a heat gun and molded it over my body double. It's not as complicated as it seems, I promise!


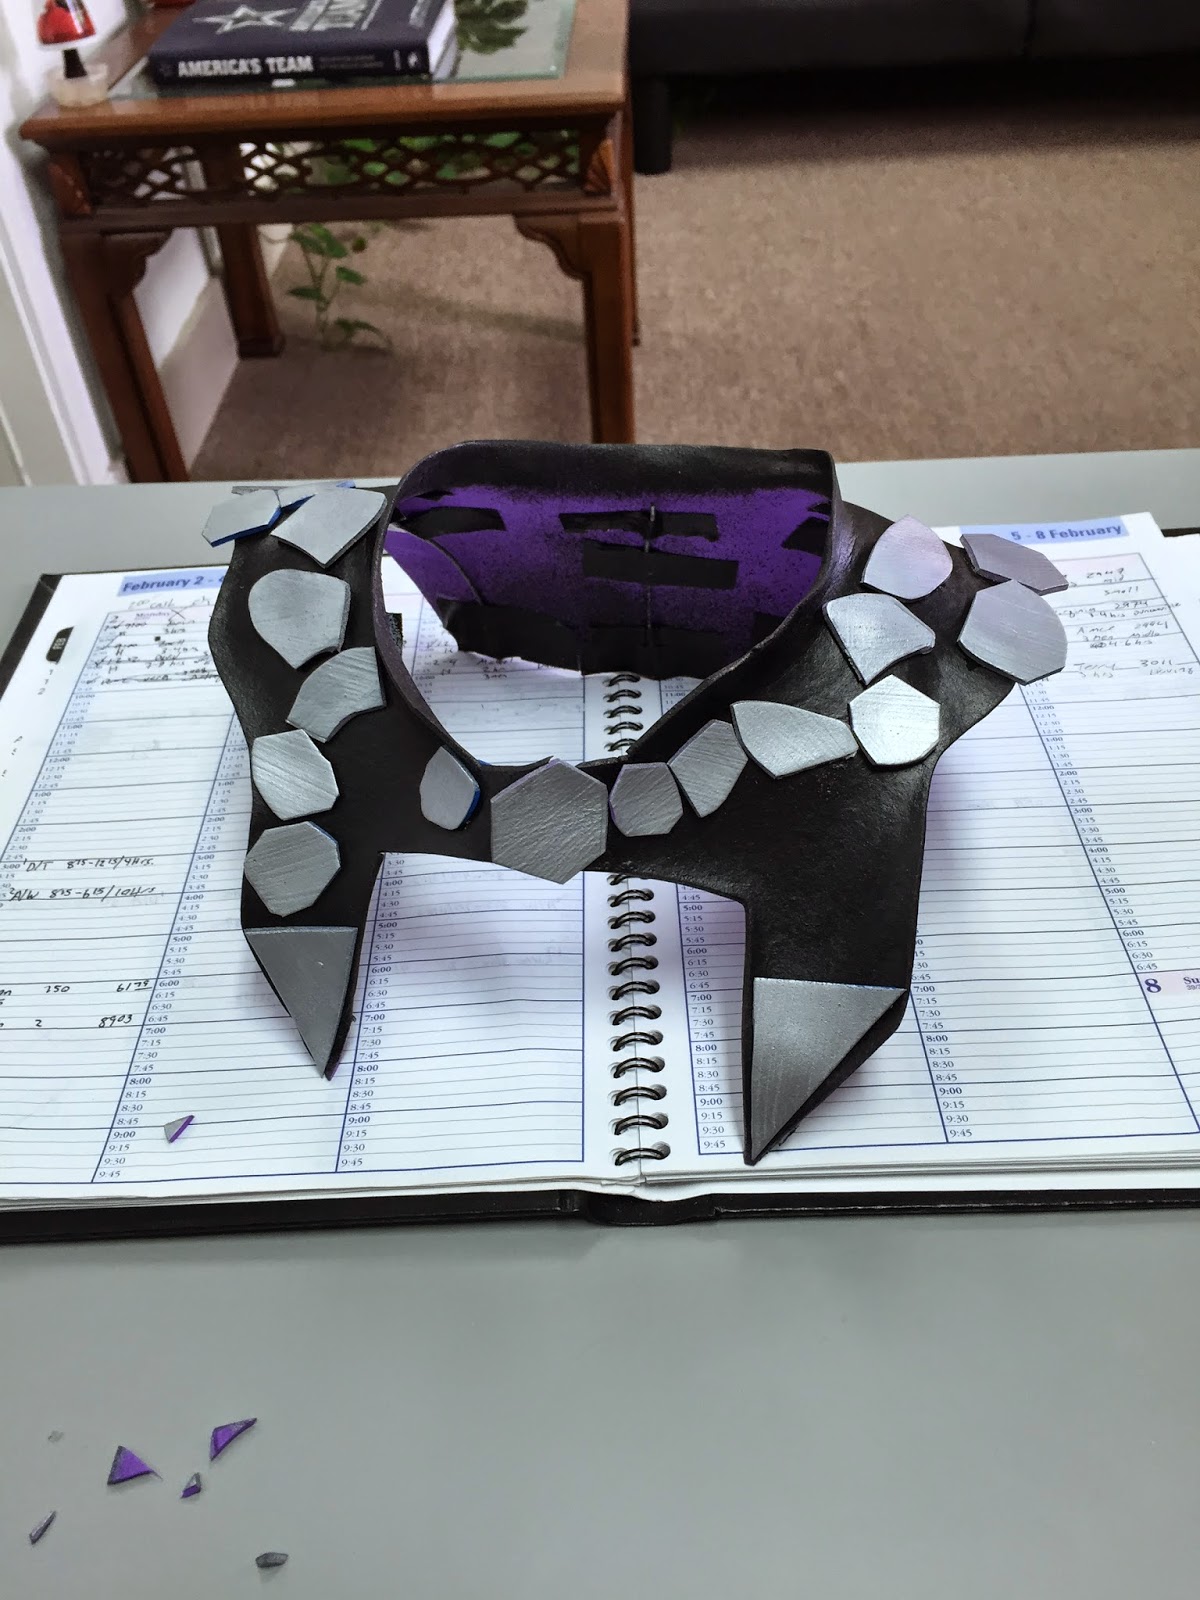
Here it is finished and painted with Plasti-Dip. I had to add wires on the inside because since it's not attached to anything, it had a tendency to want to go flat again. The wire helped it to hold its shape. 

 Okay, the gauntlets were tricky. I just wasn't sure how they were made! I looked at other tutorials and I didn't like the ways I had seen them done. Then I looked at scenes from the movie till I was cross-eyed but I finally came up with A Plan.


Okay, I'm going to do my best to describe this. I didn't have any sort of pattern, I had to completely wing it when it came to these. Basically, I wrapped canvas around my arm and marked a thumb hole. Then, I marked long, tapered strips, long enough to wrap around my arm two or three times. They pass through slits at the base of the brace. I have a vague recollection of long ago seeing something like a medical brace with a similar construction? I don't remember exactly what but if you know what I'm talking about it will help you visualize this. Then I added the blue contrasting fabric and buckles to hold the tapered ends in place, and a snap on the inside to hold the thumb flap down.

The cords around her leg kept slipping. I solved this by making two narrow bands of shelf liner to put under the cords. They didn't move all day!
The makeup was Skin Illustrator FX alcohol ink airbrushed on by my patient boyfriend.  I did her facial scars with Mehron Rigid Collodion under the ink, then added a bit of color to them with eyeliner and eyeshadow after the ink was dry.  I felt that the green ink by itself was too dark, and I plan on adding some yellow next time I do this. I also thinned the ink with alcohol for a more translucent look. I want to go on the record as saying I could not find anywhere that said it was okay to do this in any way! I didn't have any problems at all, I'm just sayin'.


For her wig, I harvested wefts from a pink wig that I had and just sewed them along the hairline. Since the pink wefts are about the same length as the brown, I think I'll need to trim the brown a little.  Theres a few pics where you can't see the pink at all!

So that's that.  I'm sure I'm missing a few things but I covered the important bits!

Friday, January 30, 2015

Gamora sword tutorial

Hey guys!  Time for another picture heavy post!
   I've been busily using what little spare time I have these days to work on my Gamora costume. It's coming along pretty well, but I sure wish I had the kind of time I used to have to work on this stuff. :/

  Today's post is just for her sword, because since I've been jumping around this costume with the attention span of an ADD gnat, it's so far the only thing I've actually finished.

I like easy whenever possible.  So instead of trying to sketch it out, I found a good pic of the sword (this is actually the Hot Toys version), chopped it into three pieces, printed it out and taped it together. Easy peasy pattern!

Then I traced it onto foam.   This is an exercise mat we'd bought for a completely different purpose and never used. It was a little too porous...more on that later. As you can see, I traced two.
Here, I've cut them out and sandwiched them together using spray adhesive with a thin dowel in between for support. This may not have been necessary but I felt better about it with the added stiffness.
Here I've roughed out the edges. Then, I used the heat gun to heat the edges and pinch/mold them together into a sword edge.
Next I looked at a bunch of pictures (seriously, looking at pictures is about 80% of the time used in making any costume) and I drew lines where the carvings are in her sword.
Then I used the cheap soldering iron (not the good one!) to melt/carve the lines into the sword.
A few of points here. One, I don't recommend doing this indoors, and if you do, make sure there's plenty of ventilation. I grew up in the country and we burned our trash.  Ever burned styrofoam?  Now, imagine that smell in your house.  And since this is close work, right up your nose. Seriously, this is probably going to give you cancer or something. Two, I forgot to take any pics of when I added the dimensional details.  Her sword has a sort of metal wrap type detail near where the shorter blade attaches.  I have no idea how to describe how I did this.  I just took thin strips of craft foam and sort of heated/molded them and wrapped them around that area.  I realise this is a terrible description and I apologise! But I didn't take pics, so...fail.  And three, remember when I said it was porous? Well, when I used Plasti Dip to seal it at this point (another thing I didn't take pictures of) I discovered really quickly that Plasti Dip- as cool as it is- won't actually smooth out a surface.  What I should have done was use Mod Podge to seal all the pores first.  But I didn't. Live and learn.
Here is the sword after Plasti Dip and paint and before I fixed the detailing, There were a lot of gaps so I used hot glue to smooth the gaps in the detailing.
Almost finished! I made a simple black wash with water and acrylic paint for the grooves to make them stand out.  Also, I have a lot of Jell-o shot cups.  Don't judge.
And here it is (mostly) finished!
When I'm finally done (hopefully soon!) I'll make another post for her costume and body paint.  Stay tuned!

Wednesday, October 1, 2014

Kitana Fan Tutorial


Time for another picture heavy tutorial!

This costume is seriously taking forever.  You never realise how much work you can get done on a Saturday until you don't get Saturdays anymore! But at least I can take my costume stuff to the office and work on it there. Just no fun to haul supplies back and forth.

I'm really pleased with how these turned out.   And they only took about three revisions, which has to be some sort of record! The first thing I did was find a good, high quality pic of the fans and then isolate one of the blades with photo editing software.  I enlarged it to the size I wanted my blades to be and printed it for a template.
After I had the template, it was a simple matter of cutting ten blades out of foamcore and then beveling the edge with an exacto knife.  You need a VERY SHARP blade to do this-I couldn't find my good blade and this knife was dull; I actually ended up using a wood chisel to finish them.


I sanded the edges with fine grit sandpaper and finished them with an emery board, and then sealed all the cut edges with Elmer's glue.
For the indented design on her blades, I used the heat from an empty glue gun. I poked a small hole first for each indent and then pressed the glue gun into each one to melt the foam core.  I wasn't actually sure if this would work, but it seemed like a scientifically sound reasoning.  And it worked perfectly!! *pats self on back* Then I painted them with metallic silver paint.
I had a hard time deciding how to make the hilts of the blades but ended up after several bad ideas using half a clothespin. They were just the right length and had a nice taper built in.
I wrapped each with some stretchy leather-like material I had left over from my pirate corset and then added silver wire to each.
I was planing on some sort of screw system to hold them together, both for ease of storage and added stability.  But I ended up just glueing them together.  They're not as sturdy as I'd like, but not as fragile as I was worried about either.
I decided the easiest way to get the pattern onto the fans would be to stamp them.  So I printed the pattern, traced it onto foam, and then cut it out and used spray adhesive to stick it to the bottom of a clearish plate (so I could see where I was placing the stamp.)
I laid the fan blades onto posterboard and traced in the arc for the fan.  Then I painted it metallic blue and cut it out, then cut the arc into the four sections for the fan.
Each section was then stamped (I went back and filled in the stamps with a small paintbrush so that the design was solid) and then each section was fan-folded three times.
All that was left was to glue each section to the back of the blades.
They turned out way better than I had hoped! I've made plenty of costumes but this was my first time actually making a prop and I'm pretty pleased with the results.  I also added an elastic strap both for hanging them to store and also to hook them to my wrists in case I don't want to hold them the entire time at con. Looking forward to getting Kitana finished so I can start on Gamora!

Monday, September 8, 2014

Costume Making Interim Post (or, Don't Get Discouraged!)

  I've been working on Kitana's fans today and I've run into several issues.  It made me decide to sit down and write this post that's been kicking around in my head for a while now. You're welcome. :)

  I get a lot of comments to the effect of, "Wow, I wish I had that talent!" or, "Wow, you made that??" And while it's always great to hear your work is appreciated, there's something you guys should know.

  I screw up.  Like, a LOT.

  Seriously, three years ago when I started on this adventure, I'd never sewn a thing in my life. I had no idea what I was doing.  And half the time, I still don't. I don't know all the fancy sewing words, and I don't know how to draft patterns. It's the biggest reason I turn down commissions- I'd love to, really, but the fact is, it's all trial and error.  I still don't have a clue what I'm doing half the time.

    My point is, don't get discouraged.  It'll work out if you stick with it!  Google and YouTube are your friends...not to mention the network of cosplayers out there.  Don't be afraid to ask someone how they made something! You may get one or two people who don't like to share "trade secrets", but the majority of people in costume at cons are nice, approachable people, willing to talk (at length!) about how to make/build/create something.

   It's definitely a growth process.  Every year I gain a little more knowledge, a little more confidence, and the willingness to try something that I was scared to do before.  It doesn't always work either! Lots of you have seen my Siren costume from TRON:Legacy. The reason I haven't yet done a tutorial on it is because I'm still not 100% happy with it...I'll just have to keep working till I get it right. (Mainly, I need to learn to make neater solder joints. Those things are killer.) I bring this costume in particular up because it's always something I wanted to do, but was always quite terrified to try. I had to learn a whole new set of skills to make it. But I'm glad I did, even if it didn't turn out quite right on the first try (or the second, or the third). Because I know in the end I'll get it right.

  So don't give up, and don't be scared to try something new or different. We're always around to give advice and encouragement. I never would have completed half of the things I've done without the great friends I've made in the cosplay community. 

  And since it's weird to have a post with no pics, here's Kitana's fans:

I'm still working, I promise!

Thursday, June 26, 2014

Cosplay boot covers!

Yeah, it's been a while! My life sorta went nuts over the past several months. But enough about that! Today I'm going to share with you how to make those awesome match-y boots that you always see on cosplayers. You know, the ones that seem to be made out of the exact same material as the costume and you've never been able to figure out how they do it?
Apologies for the poor quality of this pic.  There's very little light in my bedroom! As you can see, there's still a LONG way to go before this costume is complete, but I'll keep you updated.

Turns out it's pretty easy! I had to learn how to do it for my Kitana costume. I've always loved Kitana and there was no way I was going to half-ass it with spray painted boots, no sir! So, I did a lot of research and put together the best parts (for me) of several very good cosplay boot tutorials. 
First, finding shoes for the boot base.  You'll want something smooth, with no holes or laces or buckles or straps. (I was a little sad about covering these, to be honest!) Since you're covering them, any color will do, and it doesn't matter if they're a little scuffed or beat up.  Only the shape matters.
Next the fun begins! (By "fun", I actually mean "sweaty gross leg".) Put that shoe on and wrap it and your leg in Saran wrap. Since Kitana has really high boots, I wrapped almost all the way up my thigh.
Next, wrap that sucker with tape.  It helps to have someone else do this unless you're freakishly flexible. Start by running a long piece down the front and back of your leg and shoe.
Here is my extremely helpful and patient boyfriend wrapping and wrapping and wrapping.
Sweaty leg tape cast complete! Next it's time to cut it off.  I started from the front.....I DO NOT RECOMMEND DOING THAT! As I learned very quickly, there's no give along your shin bone, and constantly snipping your skin with scissors is no fun at all. Have your helper cut down the back of your leg instead. Draw some seam lines to guide your cutting.  This is where you'll be sewing your boot, so draw wherever you'll need a seam.  I did one down the front, one down the back, and one around the sole of the shoe.  I didn't cover the heel as I wanted it sticking out of the finished product.
Here's the three pieces of my boot pattern.  Press them as flat as possible...where there's curves and it won't lay flat (like around the toe and heel),  just cut a little snip and press it flat. When you transfer these to your fabric, just draw around the snips to make one continuous line.
Here I've transferred my tape cast pattern to newspaper.  You could just use the cast as a pattern, but I find it much cleaner and easier to work with newsprint.
And trace your pattern....
...and cut it out and pin it. All that's left at this point is to sew it up and shove the shoe in! I highly, highly recommend using FOUR-WAY STRETCH fabric to do this.  Theoretically any fabric would work, but four-way stretch is very forgiving if your measurements aren't exactly right, and doesn't require that you mess with seam allowances or add any zippers or the like.
As you can see, the sole is now covered.  I have not yet but I will definitely be putting some sort of rubber grippy shoe bottom thingy on this.  Because safety.
Ta-da!  A tall shiny blue Kitana boot!!
In addition to these type of boots looking great, matching perfectly, and being entirely customizable, they also STORE REALLY WELL. My Harley boots and Emma Frost boots take up an entire garment bag all by their onsies. These, however, fold up neatly into a regular shoebox! Which is awesome when you're trying to store fifteen or twenty costumes and all their attendant pieces.

I'll be working on Kitana more in the near future, so watch for her progress!


Monday, March 10, 2014

EVERYTHING IS AWESOME! (or, I Pulled Off a Last Minute Costume)

My last post was all about how I didn't have enough time to finish all the things I wanted to get done before All-Con.  This post is about how I MADE time to start and finish a completely new costume anyway. ;)

It wouldn't be con without the Last Minute Costume, right?

Right.

So, I give you Wyldstyle!


I saw The Lego Movie with my son the weekend before last and I decided the day after that this costume was happening. It ended up being one of the easiest costumes I've put together, as well!
I wanted a hoodie, but this is March in Texas, so black hoodies are scarce.Since I was a little short on time, I decided to buy this black jacket I found on clearance.  Bonus- it already had bright pink accents.


Also on clearance for a couple dollars I found a girl's camisole in the exact shade of pink I needed to line the hood.  I bought it, cut it up, and sewed it into the hood.


I used chalk to sketch out a rough approximation of the design of Wyldstyle's hoodie...


...then painted it in. Since there wasn't fabric paint available in the right color, I used acrylic paint.  It ended up taking FIVE coats of paint to get good coverage.

After that it was time to add the blue. Grabbed my trusty chalk again and went to town!
Of course I decided I wanted a Lego brick as well.  One tissue box, six plastic cups, some spray paint, and presto!  A Lego!
Here's a not-very-flattering closeup where it's easier to see the freckles I drew on.
After I finished the jacket it was just a matter of waiting for my wig.  I ordered the prestyled ponytail wig from Epic Cosplay, and two clip on extensions in pink and blue. I think I spent more time trying to adjust the height and location of the ponytail than I did painting the jacket! It was more difficult than I expected.  On the plus side, when I removed the fall (the ponytail extension) I discovered the base ponytail was just the right length for what I wanted. So no cutting, yay!
For the pants I decided to go with comfort first (for once!) and just used black yoga pants.  The boots I already had from my Jenny (Doctor's Daughter) costume, but they looked like something this character might wear.  You know, if she weren't plastic.

I'm really looking forward to wearing this one! It was just for fun but I ended up really liking it.  See you at All-Con!